Direction of Prayer: Difference between revisions
From Ragnafied Wiki
| (2 intermediate revisions by the same user not shown) | |||
| Line 133: | Line 133: | ||
{| class="ragnawiki-list" | {| class="ragnawiki-list" | ||
|- | |- | ||
| 1️⃣ | | 1️⃣ West → Merchant <code>/navi ra_fld10 179/176</code> to open | ||
|- | |- | ||
| 2️⃣ | | 2️⃣ Follow Miriam through multiple locations | ||
|- | |- | ||
| 3️⃣ | | 3️⃣ Defeat Ash Toads and spawned enemies | ||
|- | |- | ||
| 4️⃣ | | 4️⃣ Click Rope → "Climb up" | ||
|- | |- | ||
| 5️⃣ | | 5️⃣ Meet Maram, speak with Imril | ||
|- | |- | ||
| 6️⃣ | | 6️⃣ Teleport to village | ||
|- | |- | ||
| 🎁 | | 🎁 <strong>Reward:</strong> https://irowiki.org/images/db/item/1000405.png 50 Amethyst Fragments | ||
|} | |} | ||
</div> | </div> | ||
| Line 270: | Line 270: | ||
</div> | </div> | ||
== | == 🏔️ Villa of Deception == | ||
<div class="ragnawiki-hero"> | |||
<div class="ragnawiki-hero-title">Villa of Deception</div> | |||
<div class="ragnawiki-hero-subtitle">A challenging instance split into 3 areas with unique mechanics and 2 boss fights</div> | |||
</div> | |||
== 💀 Instance Mechanics == | |||
<div class="ragnawiki-card"> | |||
<div class="ragnawiki-card-header ragna-red">⚔️ Global Mechanics</div> | |||
<div class="ragnawiki-card-content"> | |||
<div style="display: flex; gap: 30px; flex-wrap: wrap;"> | |||
<div style="flex: 1; min-width: 300px;"> | |||
All normal monsters inside the instance use the <strong>Relieve On</strong> skill. | |||
<div class="ragnawiki-notes" style="margin-top: 15px;"> | |||
<div class="ragnawiki-tip-box" style="border-left-color: #e74c3c;"> | |||
<div style="font-weight: 600; color: #e74c3c; margin-bottom: 8px;">🛡️ Damage Reduction</div> | |||
<div style="font-size: 13px; line-height: 1.4; color: #666;"> | |||
<strong>Normal Mode:</strong> Relieve On Level 9 (90% DR)<br> | |||
<strong>Advanced Mode:</strong> Relieve On Level 10 (99% DR) | |||
</div> | |||
</div> | |||
</div> | |||
</div> | |||
<div style="flex: 1; min-width: 300px;"> | |||
<div class="ragnawiki-tip-box" style="border-left-color: #3498db;"> | |||
<div style="font-weight: 600; color: #3498db; margin-bottom: 8px;">🎯 Quick Guide</div> | |||
<div style="font-size: 13px; line-height: 1.4; color: #666;"> | |||
{| class="ragnawiki-list" | |||
|- | |||
| 🏃 || '''Area 1:''' Optional clear, avoid Reapers, sync Ghost NPCs | |||
|- | |||
| 🎪 || '''Area 2:''' Mandatory clear, use tables for plague reduction | |||
|- | |||
| ☠️ || '''Area 3:''' Mandatory clear, avoid Corrupted Plague | |||
|- | |||
| ⚡ || '''Schulang:''' Element shifting, thunderstorm patterns | |||
|- | |||
| 👑 || '''Freya:''' Chandelier mechanic, magic circles, high regen | |||
|} | |||
</div> | |||
</div> | |||
</div> | |||
</div> | |||
</div> | |||
</div> | |||
== 🗺️ Instance Walkthrough == | |||
<div class="ragnawiki-grid"> | |||
<div class="ragnawiki-card"> | |||
<div class="ragnawiki-card-header ragna-blue">1️⃣ Area 1: The Haunted Halls</div> | |||
<div class="ragnawiki-card-content"> | |||
{| class="ragnawiki-list" | |||
|- | |||
| 🎯 || '''Objective:''' Defeat 35 monsters (Optional) | |||
|- | |||
| ☠️ || '''Reapers:''' Collision deals 50% Max HP damage | |||
|- | |||
| 👻 || '''Ghost Portal:''' Two players must talk to Ghost NPCs simultaneously within 3 seconds | |||
|- | |||
| 🚪 || '''Portal:''' Opens after successful Ghost NPC interaction | |||
|} | |||
</div> | |||
</div> | |||
<div class="ragnawiki-card"> | |||
<div class="ragnawiki-card-header ragna-green">2️⃣ Area 2: The Ritual Chamber</div> | |||
<div class="ragnawiki-card-content"> | |||
{| class="ragnawiki-list" | |||
|- | |||
| 🎯 || '''Objective:''' Defeat 35 monsters | |||
|- | |||
| 🎪 || '''Corruption Tables:''' 4 center tables reduce Area 3 plague (grants random debuff) | |||
|- | |||
| 🔁 || '''Repeatable:''' Use until maximum reduction announcement | |||
|- | |||
| 🗿 || '''Portal Activation:''' Talk to 2 statues after clear | |||
|} | |||
</div> | |||
</div> | |||
<div class="ragnawiki-card"> | <div class="ragnawiki-card"> | ||
<div class="ragnawiki-card-header ragna- | <div class="ragnawiki-card-header ragna-purple">3️⃣ Area 3: Plague Grounds</div> | ||
<div class="ragnawiki-card-content"> | <div class="ragnawiki-card-content"> | ||
{| class="ragnawiki-list" | |||
|- | |||
| 🎯 || '''Objective:''' Defeat 35 monsters | |||
|- | |||
| ☠️ || '''Corrupted Plague:''' Casts Gradual Gravity (-30% Max HP/sec) | |||
|- | |||
| 🚪 || '''Portal:''' Opens automatically after clearing all monsters | |||
|} | |||
</div> | |||
</div> | </div> | ||
</div> | |||
== ⚔️ Boss Fights == | |||
<div class="ragnawiki-grid"> | |||
<div class="ragnawiki-card"> | |||
<div class="ragnawiki-card-header ragna-orange">⚡ Schulang https://muhro.eu/flux/data/monsters/21316.gif</div> | |||
<div class="ragnawiki-card-content"> | |||
{| class="ragnawiki-list" | {| class="ragnawiki-list" | ||
|- | |- | ||
| | | 🎯 || '''Start:''' Party leader talks to Schulang | ||
|- | |||
| ⛈️ || '''Thunderstorm:''' Pattern with 1 safe spot (minor damage) | |||
|- | |||
| 🌪️ || '''Elements:''' Shifts between Wind, Holy, Ghost | |||
|- | |||
| 🛡️ || '''Relieve:''' Level 1 (10% DR) + Mode-based reduction | |||
|} | |||
<div class="ragnawiki-notes" style="margin-top: 15px;"> | |||
<div class="ragnawiki-tip-box" style="border-left-color: #e67e22;"> | |||
<div style="font-weight: 600; color: #e67e22; margin-bottom: 8px;">📊 Damage Reduction</div> | |||
<div style="font-size: 13px; line-height: 1.4; color: #666;"> | |||
<strong>Normal Mode:</strong> 90% DR total<br> | |||
<strong>Advanced Mode:</strong> 99% DR total | |||
</div> | |||
</div> | |||
</div> | |||
</div> | |||
</div> | |||
<div class="ragnawiki-card"> | |||
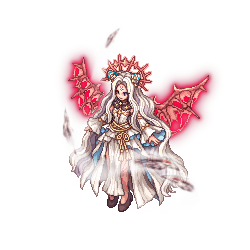
<div class="ragnawiki-card-header ragna-red">👑 Twisted God Freya https://muhro.eu/flux/data/monsters/21317.gif</div> | |||
<div class="ragnawiki-card-content"> | |||
{| class="ragnawiki-list" | |||
|- | |- | ||
| | | 🎯 || '''Summon:''' Interact with north altar | ||
|- | |- | ||
| | | 💡 || '''Chandelier:''' Stronger when away (skill damage ↑, Relieve Lv.1-10) | ||
|- | |- | ||
| | | 🔮 || '''Magic Circles:''' Teleport to Area 1, disable via White Aura NPCs (costs SP) | ||
|- | |- | ||
| | | 🔥 || '''Cane of Evil Eye:''' 15k fixed damage/sec laser field | ||
|- | |- | ||
| | | ❤️ || '''Regen:''' High HP regeneration scales with active Magic Circles | ||
|} | |} | ||
<div class="ragnawiki-notes" style="margin-top: 15px;"> | |||
<div class="ragnawiki-tip-box" style="border-left-color: #e74c3c;"> | |||
<div style="font-weight: 600; color: #e74c3c; margin-bottom: 8px;">📊 Base Damage Reduction</div> | |||
<div style="font-size: 13px; line-height: 1.4; color: #666;"> | |||
<strong>Normal Mode:</strong> 90% DR minimum<br> | |||
<strong>Advanced Mode:</strong> 99% DR minimum | |||
</div> | |||
</div> | |||
</div> | |||
</div> | |||
</div> | </div> | ||
</div> | |||
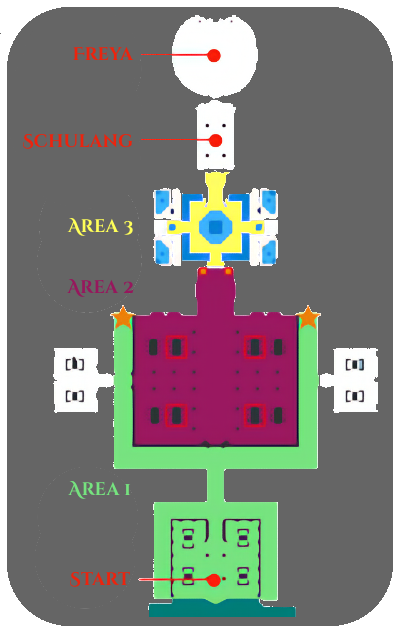
== 🗺️ Instance Map == | |||
<div class="ragnawiki-card"> | |||
<div class="ragnawiki-card-header ragna-dark">🎯 Visual Guide</div> | |||
<div class="ragnawiki-card-content"> | |||
<div style="text-align: center;"> | |||
https://wiki.muhro.eu/images/f/fc/MapVilla.png | |||
<div style="margin-top: 10px; font-size: 13px; color: #666;"> | |||
<em>Villa of Deception instance layout and key locations</em> | |||
</div> | |||
</div> | |||
</div> | |||
</div> | |||
<div class="ragnawiki-hero" style="background: linear-gradient(135deg, #e74c3c, #c0392b); color: white; margin-top: 30px;"> | |||
<div class="ragnawiki-hero-title">💀 Ready for the Challenge?</div> | |||
<div class="ragnawiki-hero-subtitle">Coordinate with your party and master the mechanics to conquer the Villa of Deception!</div> | |||
</div> | </div> | ||
Latest revision as of 18:29, 20 January 2026
🙏 Direction of Prayer Quest Guide
Episode 18: Direction of Prayer
Continues Rachel Sanctuary storyline
🎫 Quest Overview
📋 Requirements
| 📊 | Base Level: 170 |
| 🔗 | Prerequisites: Sage Legacy |
| 🏰 | Rachel Sanctuary: Step 4 (bypassable) |
🎁 Rewards
| 💎 | Amethyst Fragments: 700 total |
| ⭐ | Main Quest EXP: 460 |
| 📚 | Side Quest EXP: 240 |
| 👒 | Costume: Mini Elly Mini Elly
|
📍 Quick Start
| ✈️ | Air Ship Depot: Smart Elly /navi ba_in01 26/266
|
| 🔮 | Teleport: Court Mage Nilem /navi pub_cat 86/105
|
| 👒 | Required:  Mini Elly headgear Mini Elly headgear
|
🚀 Main Quest Walkthrough
1. Rachel Introduction
| 1️⃣ | Travel to Rachel, equip  Mini Elly Mini Elly
|
| 2️⃣ | Save in Rachel (recommended) |
| 3️⃣ | Interact with Masked Person /navi rachel 182/176
|
| 4️⃣ | Speak with Nervous Priest twice |
| 🎁 | Reward:  20 Amethyst Fragments 20 Amethyst Fragments
|
2. Temple Investigation
| 1️⃣ | Enter temple → Nervous Priest /navi ra_temple 72/54
|
| 2️⃣ | Follow west → Nervous Priest /navi ra_temple 30/142
|
| 🎁 | Reward:  30 Amethyst Fragments 30 Amethyst Fragments
|
| 🚪 | Enter temple interior via: • iRO: Dungeon Teleporter → Rachel • Non-iRO: Eridanus → Sneak in |
3. Niren's Request
| 1️⃣ | Speak with Guard Dent /navi ra_temin 173/40
|
| 2️⃣ | Talk to Guard Neil, Priest Freya |
| 3️⃣ | Meet Niren /navi ra_temin 213/87
|
| 4️⃣ | Interview 4 villagers in Rachel |
| 5️⃣ | Speak with Maram /navi rachel 70/147
|
4. Gray Children
| 1️⃣ | Speak with Miriam, interview merchants |
| 2️⃣ | Help Maram, find dumplings /navi rachel 108/73
|
| 3️⃣ | Speak with Mark, find box /navi rachel 40/132
|
| 4️⃣ | Exit west → Merchant/Maram /navi ra_fld11 354/235
|
🏰 Oz Labyrinth Instance
⚔️ Oz Labyrinth - Single Player Instance
1️⃣ West → Merchant /navi ra_fld10 179/176 to open
|
| 2️⃣ Follow Miriam through multiple locations |
| 3️⃣ Defeat Ash Toads and spawned enemies |
| 4️⃣ Click Rope → "Climb up" |
| 5️⃣ Meet Maram, speak with Imril |
| 6️⃣ Teleport to village |
🎁 Reward:  50 Amethyst Fragments 50 Amethyst Fragments
|
⭐ Reputation System
📊 Need 1000+ Reputation
Under Level 200 (1020 rep)
| 🏰 | Labyrinth & Merchant (100) |
| 1️⃣ | Oz Labyrinth 1F Daily (30) |
| 💬 | Ahab's Gossip (100) |
| 📖 | Collecting Folklore (100) |
| 🏠 | Where is My Home (100) |
| 📦 | Shortage of Supplies Daily (30) |
Level 200+ (1050 rep)
| 🔼 | All above plus: |
| 2️⃣ | Oz Labyrinth 2F Daily (30) |
| 🚫 | No Evil Beasts (100) |
| 🐑 | Unexpected Shepherd Daily (30) |
| 😴 | Can't Sleep (100) |
| 🎯 | Horim's Adventure (100) |
🐺 Gray Wolf Forest
Gray Wolf Tournament
| 1️⃣ | Village Boy /navi wolfvill 180/179
|
| 2️⃣ | Southwest → Suad /navi wolfvill 144/151
|
| 3️⃣ | Interview 4 villagers for opinions |
| 4️⃣ | Speak with Miriam →  40 Amethyst Fragments 40 Amethyst Fragments
|
Source of Weapons
| 1️⃣ | Rachel: Bearded Jack /navi rachel 75/44
|
| 2️⃣ | Veins: Dandelion /navi veins 293/282
|
| 3️⃣ | Thor's Volcano: Maram /navi thor_v01 169/169
|
| 4️⃣ | Thor Military Base Instance |
| 🎁 | Reward:  50 Amethyst Fragments 50 Amethyst Fragments
|
⚔️ Major Instances
🏭 Thor Military Base
| 1️⃣ | Maram ×2 → Enter instance |
| 2️⃣ | Activate 3 Lock Devices |
| 3️⃣ | Defeat enemy waves |
| 4️⃣ | Click 5 Document Piles |
| 5️⃣ | Speak with Miriam, exit with Maram |
🐺 Wolves Gathering Place
| 1️⃣ | Follow Miriam → Protest event |
| 2️⃣ | Defeat Temple Guards at 4 portals |
| 3️⃣ | Multiple Miriam encounters |
| 4️⃣ | Exit → Niren →  60 Amethyst Fragments + EXP 60 Amethyst Fragments + EXP
|
🏔️ Villa of Deception
Villa of Deception
A challenging instance split into 3 areas with unique mechanics and 2 boss fights
💀 Instance Mechanics
⚔️ Global Mechanics
All normal monsters inside the instance use the Relieve On skill.
🛡️ Damage Reduction
Normal Mode: Relieve On Level 9 (90% DR)
Advanced Mode: Relieve On Level 10 (99% DR)
🎯 Quick Guide
| 🏃 | Area 1: Optional clear, avoid Reapers, sync Ghost NPCs |
| 🎪 | Area 2: Mandatory clear, use tables for plague reduction |
| ☠️ | Area 3: Mandatory clear, avoid Corrupted Plague |
| ⚡ | Schulang: Element shifting, thunderstorm patterns |
| 👑 | Freya: Chandelier mechanic, magic circles, high regen |
🗺️ Instance Walkthrough
1️⃣ Area 1: The Haunted Halls
| 🎯 | Objective: Defeat 35 monsters (Optional) |
| ☠️ | Reapers: Collision deals 50% Max HP damage |
| 👻 | Ghost Portal: Two players must talk to Ghost NPCs simultaneously within 3 seconds |
| 🚪 | Portal: Opens after successful Ghost NPC interaction |
2️⃣ Area 2: The Ritual Chamber
| 🎯 | Objective: Defeat 35 monsters |
| 🎪 | Corruption Tables: 4 center tables reduce Area 3 plague (grants random debuff) |
| 🔁 | Repeatable: Use until maximum reduction announcement |
| 🗿 | Portal Activation: Talk to 2 statues after clear |
3️⃣ Area 3: Plague Grounds
| 🎯 | Objective: Defeat 35 monsters |
| ☠️ | Corrupted Plague: Casts Gradual Gravity (-30% Max HP/sec) |
| 🚪 | Portal: Opens automatically after clearing all monsters |
⚔️ Boss Fights
⚡ Schulang 

| 🎯 | Start: Party leader talks to Schulang |
| ⛈️ | Thunderstorm: Pattern with 1 safe spot (minor damage) |
| 🌪️ | Elements: Shifts between Wind, Holy, Ghost |
| 🛡️ | Relieve: Level 1 (10% DR) + Mode-based reduction |
📊 Damage Reduction
Normal Mode: 90% DR total
Advanced Mode: 99% DR total
👑 Twisted God Freya 

| 🎯 | Summon: Interact with north altar |
| 💡 | Chandelier: Stronger when away (skill damage ↑, Relieve Lv.1-10) |
| 🔮 | Magic Circles: Teleport to Area 1, disable via White Aura NPCs (costs SP) |
| 🔥 | Cane of Evil Eye: 15k fixed damage/sec laser field |
| ❤️ | Regen: High HP regeneration scales with active Magic Circles |
📊 Base Damage Reduction
Normal Mode: 90% DR minimum
Advanced Mode: 99% DR minimum
🗺️ Instance Map
🎯 Visual Guide

Villa of Deception instance layout and key locations
💀 Ready for the Challenge?
Coordinate with your party and master the mechanics to conquer the Villa of Deception!
🏁 Final Steps
🎉 Episode Completion
| 1️⃣ | Maram → Temple teleport |
| 2️⃣ | Sanctum: Miriam /navi ra_temin 254/117
|
| 3️⃣ | Unequip  Mini Elly → Speak with Miriam Mini Elly → Speak with Miriam
|
| 4️⃣ | Elly's Figure → Final rewards |
🎁 Final Rewards
 180 Amethyst Fragments +
  Costume Mini Elly
Episode 18 Completed!
📚 Side Quests
Labyrinth & Merchant
Start: Imril /navi wolfvill 143/113
| 1️⃣ | Oz Labyrinth 1F sparkles (4 locations) |
| 2️⃣ | Defeat 10 monsters |
| 3️⃣ | Speak with Old Man |
| 🎁 | Reward:  20 Amethyst + 100 Rep 20 Amethyst + 100 Rep
|
Ahab's Gossip
Start: Zlan /navi wolfvill 85/111
| 1️⃣ | Interview Karr, Redcell, Ahab |
| 2️⃣ | Rachel Merchant → Oiger Sauce |
| 3️⃣ | Return to Ahab, Zlan |
| 🎁 | Reward:  20 Amethyst + 100 Rep 20 Amethyst + 100 Rep
|
Collecting Folklore
Start: Gura /navi wolfvill 61/170
| 1️⃣ | Speak with Dinar, Amira, Shanina |
| 2️⃣ | Return to Gura |
| 🎁 | Reward:  20 Amethyst + 100 Rep 20 Amethyst + 100 Rep
|
Where is My Home
Start: Old Man /navi wolfvill 176/111
| 1️⃣ | Speak with Ezekiel 3x |
| 2️⃣ | Give 3 Steel |
| 🎁 | Reward:  20 Amethyst + 100 Rep 20 Amethyst + 100 Rep
|
🔓 Unlocked Content
📅 Daily Quests
| 1️⃣ | Oz Labyrinth 1F (Lv.170+) |
| 2️⃣ | Oz Labyrinth 2F (Lv.200+) |
| 📦 | Shortage of Supplies |
| 🐑 | Unexpected Shepherd |
🎯 Progress
| ✅ | Episode 18 Completed |
 |
700 Amethyst Fragments |
| 👒 | Costume Mini Elly |
| 🏰 | Rachel Sanctuary access |
➡️ Continue to
 |
Issgard (Episode 19) |
| 🎯 | Next major storyline |
| 🏔️ | Snowy mountain adventure |
